Monday, April 11, 2022

Flowering Rain Boots in Review

 Hello, my stamping friend!

Flowering Rain Boots bundle is another fun spring bundle! I just love all the images there and it is so easy to create with this bundle. 

Here is a card we made at my wine class. And then I created several thank you cards.

The design is very simple - I use this layout often. It gives me a lot of miles from the DSP. 

Cut DSP to 3/4 x 5 1/4" and 2 1/4 x 5 1/4" (main pattern), adhere it to both sides of the card front. Adhere a strip of the DSP ( 1 1/4 x 5 1/4") of the contrasting color in the middle. Cut a label, stamp on it - and you are all done!

If you need any supplies - visit my online store , hostess code 49HGHSBV.

Happy Stamping!

Sunday, April 10, 2022

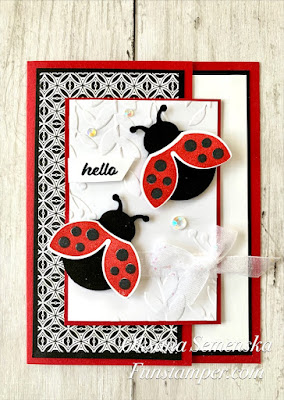
Hello, Ladybug

 Hello, my stamping friend.

I have a fun card to share with you today. We made this card back in February at my Crafting Happy Hour class. It features Hello Ladybug bundle.


Measurements: 

  • Real Red CS: 5 ½ x 7 ¼”; 2 ¾ x 4”; 
  • Basic White CS: 2 5/8 x 3 7/8”; 3 ¾ x 5”; scrap for a stamping. 
  • Basic Black CS: 2 5/8 x 5 1/8”; 3 7/8 x 5 1/8”; scrap for punching 
  • DSP: 2 ½ x 5”

Instructions: 

  1. Score Real Red CS on 7 ¼” side at 4 ¼”. 
  2. Adhere DSP to corresponding Basic Black piece, adhere to the front of the card. 
  3. Adhere larger piece of basic white to the basic black piece. Adhere inside of the card. 
  4. Emboss basic white piece using greenery embossing folder. Wrap piece of a ribbon around it securing on the back. Adhere to the real red CS. 
  5. Punch 2 ladybug bodies from basic black CS. 
  6. Stamp wings 2 times in real red ink and centers in memento black on scrap of basic white. Punch wings with a punch. Add wings to the bodies with dimensionals. 
  7. Add 2 ladybugs to the embossed piece with dimensional, 
  8. Stamp “Hello” in memento black on a skinny strip of basic white. Trim to the needed sized. Add with dimensionals. 
  9. Adhere a piece with ladybugs to the card front with dimensionals – make sure you add dimensionals only to the left side. 
  10. Add a bow with a glue dot. 
  11. Add few rhinestones. 


If you need any supplies - visit my online store ,  hostess code is 49HGHSBV. Thank you for your support.  

Happy Stamping!  


Friday, April 8, 2022

Tulip Fields Step Card

 Hello, my stamping friend.

I had a Facebook Live Wednesday and showed two easy funky folds featuring Tulip Fields bundle.  First card was an easel card, you can find the post here.

Today I am sharing a second card - easy step fold.It is very easy to make and it folds flat for mailing.

Side view:
I love how it can stand on its own!

Measurements:

  • Pool Party CS (for main card): 5 1/2 x 8” scored at 1, 2 and 5”
  • Pool Party CS (for a flap): 2 1/2 x 6” scored 4 1/4” 
  • DSP: 2 1/4 x 4”; 2 3/4 x 5 1/4” 
  • Basic White: 7/8 x 5 1/4” 

Watch a video (second half) how to make it:


Give this fold a try!


If you need any supplies - visit my online store , hostess code 49HGHSBV.

Happy Stamping!   

Wednesday, April 6, 2022

Tulip Fields Easel card

 Hello, my stamping friend!

Over a week ago I finally held my Tulip Fields Class that was rescheduled back in February. I am absolutely in love with this suite of products! Tulips, windmills, spring - what not to like?

I am sharing one of the card we made. This was probably the simplest but everybody loved it.

Here is how it looks when closed:


Measurements:

  • Pool Party CS: 4 ¼ x 11”; scored at 2 3/4 and 5 1/2";
  • Basic White CS: 4 x 5 ¼”; 2 ½ x 4”; label, scrap for a windmill 
  • Poppy Parade CS: label 
  • Crumb Cake and Soft Suede CS: scraps for a windmill. 
  • DSP: 2 3/8 x 3 7/8: (3) ¾ x 3 7/8”; 
  • Ribbon: 2 (2)”; brad; 2 butterflies

Any pattern of this DSP will work!

Watch how to make this card (first half of the video):


 If you need any supplies - visit my online store ,hostess code 49HGHSBV.

Happy Stamping!