Saturday, March 26, 2016

Team Stamp It Spring Blog Hop

 
 Welcome to Team Stamp It monthly blog hop. This month's theme is Spring. And spring for me is associated with many beautiful soft colored flowers. Stampin Up! offers two of them - there are many stamp sets with floral images and several colors that come to mind right away (like Blushing Bride, Soft Sky, So Saffron, Mint Macaron - just to name a few).
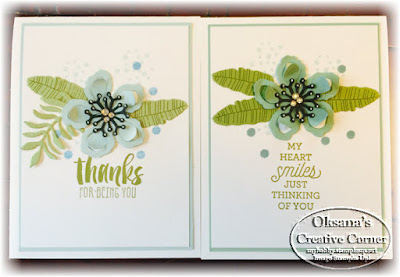
Today I decided to use Botanical Blooms set and framelits. I am absolute in love with this combo. The framelit makes it so easy to create flowers! And let me tell you - and now I am all about quick and easy, haha.
Blushing Bride and Wisteria Wonder:

Soft Sky and Mint Macaron:
 And of course - So Saffron is my favorite:

Closer look of the flower - you can see I sponged centers with darker ink and used Signo white pen on black centers:


What do you think? Which color is your favorite? Leave me a comment and you will be entered in a drawing:
 Thank You for stopping by. Here is the list to continue:

Happy Stamping!

Product Used Today:
Big Shot
[113439]
$110.00

Monday, March 14, 2016

Happy Birthday in Watermelon Wonder

Happy Monday!
Today I want to share with you another card made with Rose Wonder bundle and simple water coloring. The small flower and leaves in this set are my favorite images. And it is so much fun to color those 2 in different colors! Defiantly use re-inkers vs stamp pad. Enjoy!

Measurement:
  • Whisper White thick card stock: 11” x 4 ¼”, score at 5 ½” 
  • Whisper White card stock: 3 ¾ x 5” and scrap for sentiment 
  • Watermelon Wonder: 3 7/8 x 5 1/8” 
  • Watercolor Paper: scrap to stamp flower and leaves 
How To's:
  1. Create your card base by scoring a 4 ¼” x 11” piece of cardstock at 5 ½” and folding it in half using a bone folder to create a crisp crease. 
  2. Stamp the frame and “happy birthday” greeting onto a scrap piece of Whisper White CS using Tuxedo Black Memento ink. Die cut the greeting using frame die in Rose Wonder bundle. 
  3. Stamp the leaves and the small flower onto the watercolor paper using VersaMark ink. Heat emboss the images with black embossing powder. 
  4. Color leaves with aqua painter and old olive ink, color flower with watermelon wonder ink. Let it dry. Cut with scissors. 
  5. Once the flower and leaves are dry, fussy cut them out, cutting the leaves away from the stem. Stick leaves to the back of the flower using liquid adhesive. 
  6. Rub an embossing buddy over the 3 ¾” x 5” piece of Whisper White cardstock. Randomly stamp the small flower a couple times onto the top of the card stock using VersaMark ink. Heat emboss the images using white embossing powder. 
  7. Wrap 5 ½” piece of ribbon around white stamped piece. Stick the panel onto the Watermelon Wonder card stock. Stick the matted panel onto the card base. 
  8. Stick the greeting onto the card using dimensional adhesive. Stick the floral element onto the card using dimensional adhesive. Stick a rhinestone in the center of the flower.
Thank you for stopping by. Please check my store if you need anything.

Happy Stamping!  

Product List
Heat Tool
[129053]
$30.00

Saturday, March 5, 2016

Easter Basket Instructions

Happy Saturday!
Last week I participated in Team Stamp It blog hop and shared my projects - a card and a little basket. If you missed it - see full post HERE. I got so many nice comments  and feedback. Thank You everybody for kind words!

Today I will share with you how to create this darling basket.  This basket is so easy to make, very economical - you will need just half sheet of card stock (same amount as you use for a card) and a scrap for a handle.
How Tos: 
  • Start with 4 1/4 x 11 piece of card stock. Score according to template - on 4 1/4 side score at 2 3/4 and on 11" side score at 1 3/4, 3 1/2, 5 1/4, 7, 8 3/4 and 10 1/2
  • Cut small rectangle out (the grey one on the template) and cut on the solid lines.
  • On the front of the basket layer add Sticky Strip to 1/2" tab on right edge and edge of 1st and 4th flaps from the left edge. Flip the basket layer over and add Sticky Strip to edge of 1st and 4th flaps.
  • Add Sticky Strip to each end of the 2” x 10-1/2” Designer paper (or you can use stamped Whisper White card stock instead). Add a line of SNAIL along the length of the strip. Center strip on the basket layer starting at the end opposite the Sticky Strip on the 1/2” tab. 
  • Fold the basket layer along the score lines. Adhere the 1/2" tab with Sticky Strip to the inside of the opposite end to create the hexagon (6 sided) shape.
  • Remove Sticky Strip backing from the two flaps where Sticky Strip is on the front side. Fold those two flaps in so they just meet in the center ( to make it easier - a secure it with piece of sticky strip). Fold down the two flaps without Sticky Strip, press to adhere. 
  • Remove Sticky Strip backing from the two remaining flaps. Fold down, press to adhere. Also press from inside the basket to get a good bond.
    And this is it for the basket. May be little bit tricky first time, but after you get a grip - super fast and easy Remember - flaps need to touch and NOT overlap.
  • Handle - 3/4 x 8 1/2 piece of card stock. You may add 1/2 x 8 1/2 piece of designer paper on top of it. Add two small strips of Sticky Strip next to each other on both ends of handle on the front side. Adhere to your basket.
  • Decorate as desired.
And this time I decided to do a basket in watermelon wonder color and use coordinating envelope paper instead of DSP and also use it for flower.

 This is thin paper, so fold the paper and punch 2-3 layers at the time. This paper curls beautifully and you can see opposite  side on flower petals.
You will need 8 big, 8 small and 2 double petals, plus 2 bigger and 2 smaller circles to assemble flowers. It goes very fast with glue dots.Stack those 4 circles with dimensionals. here is a little visual for you:
 Leave me a comment if you like this project!
 Would You like to receive my last class tutorial or kit to go? Check Here.

Happy Stamping!

Product List
Glue Dots
[103683]
$5.25